Set up staging environment for Frontend
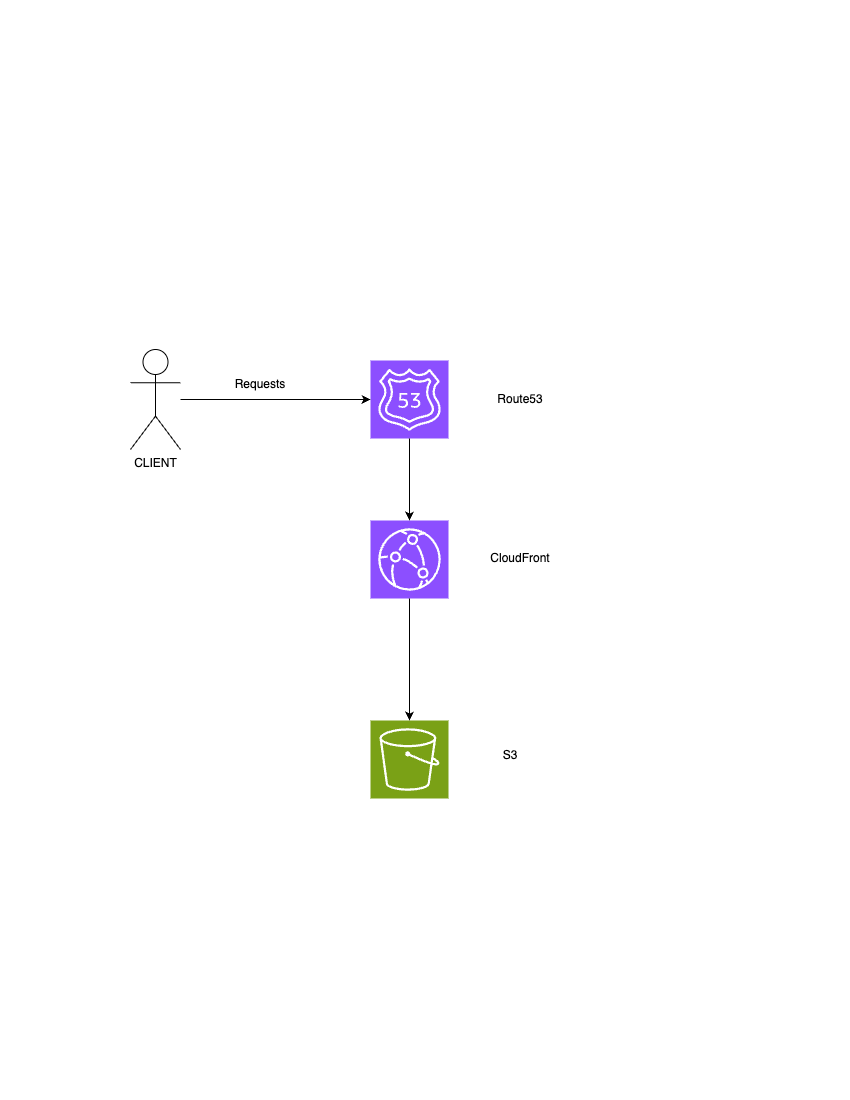
CloudFront → S3
Lets create each terraform file for a single purpose
Lets define all the varibles needed throughout our terraform first
variable.tf
variable "aws_region" {
  description = "The AWS region to deploy the resources in."
  type        = string
  default     = "ap-south-1"

  validation {
    condition     = contains(["ap-south-1"], var.aws_region)
    error_message = "The AWS region must be one of the following: ap-south-1."
  }
}

variable "environment" {
  description = "The environment for the resources."
  type        = string
  default     = "Staging"

  validation {
    condition     = contains(["Staging"], var.environment)
    error_message = "The environment must be Staging."
  }

}

variable "s3_name" {
  description = "The name of the S3 bucket."
  type        = string
  default     = "terraform-campus-space-dev-bucket"
}
This File is only for our s3. While creating it make sure to define a policy. In this below snippet the policy is catered to only allow access if cloudfront requests the files in s3.
main.tf ( or s3.tf )
resource "aws_s3_bucket" "this" {
  bucket = var.s3_name
}

resource "aws_s3_bucket_policy" "this" {
  bucket = aws_s3_bucket.this.id

  policy = jsonencode({
    Version = "2012-10-17",
    Statement = [
      {
        Sid : "AllowCloudFrontAccessOnly",
        Effect : "Allow",
        Principal = "*",
        Action : "s3:GetObject",
        Resource : "${aws_s3_bucket.this.arn}/*",
        Condition : {
          StringEquals : {
            "aws:SourceArn" = aws_cloudfront_distribution.this.arn
          }
        }
      }
    ]
  })
}
This Terraform configuration sets up a CloudFront distribution to serve content from an S3 bucket securely using Origin Access Control (OAC). The locals block defines the origin ID and retrieves the S3 bucket's regional domain name, which is later used in the CloudFront configuration.
An aws_cloudfront_origin_access_control resource is created to enable secure access from CloudFront to the S3 bucket using SigV4 signing. This replaces the older Origin Access Identity (OAI) method and ensures that S3 content can only be accessed through CloudFront.
The aws_cloudfront_distribution resource defines the CloudFront setup. It enables the distribution, sets the default root object, and configures custom error responses to serve index.html on 404 and 403 errors, useful for single-page applications. The origin section links CloudFront to the S3 bucket using the OAC. Cache settings are configured for minimal TTLs, and HTTPS is enforced with a provided ACM certificate. A custom domain alias (staging.campusspace.in) is also attached.
To map the custom domain to the CloudFront distribution, the code uses a data block to fetch the Route 53 hosted zone and an aws_route53_record to create an alias A record. This ensures that traffic to staging.campusspace.in is directed to the CloudFront distribution, allowing users to access the site through the custom domain over HTTPS.
cloudfront.tf
locals {
  s3_origin_id   = "${var.s3_name}-origin"
  s3_domain_name = aws_s3_bucket.this.bucket_regional_domain_name
}

resource "aws_cloudfront_origin_access_control" "oac" {
  name                              = "my-oac"
  description                       = "Access S3 securely"
  origin_access_control_origin_type = "s3"
  signing_behavior                  = "always"
  signing_protocol                  = "sigv4"
}

resource "aws_cloudfront_distribution" "this" {

  enabled             = true
  default_root_object = "index.html"

  custom_error_response {
    error_code         = 404
    response_code      = 200
    response_page_path = "/index.html"
  }

  custom_error_response {
    error_code         = 403
    response_code      = 200
    response_page_path = "/index.html"
  }

  origin {
    origin_id                = local.s3_origin_id
    domain_name              = local.s3_domain_name
    origin_access_control_id = aws_cloudfront_origin_access_control.oac.id
    s3_origin_config {
      origin_access_identity = "" # must be empty for OAC
    }
  }

  default_cache_behavior {

    target_origin_id = local.s3_origin_id
    allowed_methods  = ["GET", "HEAD"]
    cached_methods   = ["GET", "HEAD"]

    forwarded_values {
      query_string = true

      cookies {
        forward = "all"
      }
    }

    viewer_protocol_policy = "redirect-to-https"
    min_ttl                = 0
    default_ttl            = 0
    max_ttl                = 0
  }

  restrictions {
    geo_restriction {
      restriction_type = "none"
    }
  }

  viewer_certificate {
    acm_certificate_arn      = "arn:aws:acm:us-east-1:058264333757:certificate/73ea0bf4-3d1b-4957-baa8-c783fe185f5e"
    ssl_support_method       = "sni-only"
    minimum_protocol_version = "TLSv1.2_2021"
  }

  aliases = ["staging.campusspace.in"]


  price_class = "PriceClass_200"

}

# Fetch the hosted zone for your subdomain
data "aws_route53_zone" "staging" {
  name         = "staging.campusspace.in"
  private_zone = false
}

# Add a Route 53 alias A record for the CloudFront distribution
resource "aws_route53_record" "alias" {
  zone_id = data.aws_route53_zone.staging.zone_id
  name    = "staging.campusspace.in"
  type    = "A"

  alias {
    name                   = aws_cloudfront_distribution.this.domain_name
    zone_id                = aws_cloudfront_distribution.this.hosted_zone_id
    evaluate_target_health = false
  }
}
Terraform needs to store its state. Meaning it needs to know the updates that the resouces have gone through. so terraform uses a state file. Without this terraform will be out of sync. Currently I have stored the state file in another s3 bucket and referenced the url because storing it remotely is better than local.
backend.tf
terraform {
  backend "s3" {
    bucket = "campus-space-terraform-state-staging"
    key    = "campus-space/cloud/terraform.tfstate"
    region = "ap-south-1"
  }
}
provider.tf
provider "aws" {
  region = var.aws_region
}
Makefile
Instead of running terraform apply,init,destroy everytime ,we can use a makefile to easily use shell commands .Helps more if terraform is in a seperate folder.
# Variables
TERRAFORM_DIR := ./terraform

# Targets
.PHONY: init apply destroy

init:
    cd $(TERRAFORM_DIR) && terraform init

apply:
    cd $(TERRAFORM_DIR) && terraform apply -auto-approve

destroy:
    cd $(TERRAFORM_DIR) && terraform destroy -auto-approve
set up a pipeline job to create the resources and deploy static files into s3
.gitlab-ci.yml
stages:
  - terraform
  - build
  - deploy
  - cleanup
  - destroy

terraform:
  stage: terraform
  image:
    name: hashicorp/terraform:light
    entrypoint: [""]
  before_script:
    - apk add --no-cache bash make
  script:
    - make init
    - make apply
  rules:
    - if: '$CI_PIPELINE_SOURCE == "schedule"'
      when: never
    - if: '$CI_COMMIT_BRANCH == "main"'

build:
  stage: build
  image: node:18
  script:
    - npm ci
    - npm run build
  artifacts:
    paths:
      - dist/
  rules:
    - if: '$CI_PIPELINE_SOURCE == "schedule"'
      when: never
    - if: '$CI_COMMIT_BRANCH == "main"'

deploy:
  stage: deploy
  image: python:3.11-slim
  dependencies:
    - build
  before_script:
    - pip install s3cmd
    - |
      cat > ~/.s3cfg <<EOF
      [default]
      access_key = $AWS_ACCESS_KEY_ID
      secret_key = $AWS_SECRET_ACCESS_KEY
      host_base = s3.amazonaws.com
      host_bucket = %(bucket)s.s3.amazonaws.com
      use_https = True
      EOF
  script:
    - s3cmd sync dist/ s3://terraform-campus-space-dev-bucket/ --delete-removed
  rules:
    - if: '$CI_PIPELINE_SOURCE == "schedule"'
      when: never
    - if: '$CI_COMMIT_BRANCH == "main"'

cleanup:
  stage: cleanup
  image: python:3.11-slim
  script:
    - pip install s3cmd
    - |
      cat > ~/.s3cfg <<EOF
      [default]
      access_key = $AWS_ACCESS_KEY_ID
      secret_key = $AWS_SECRET_ACCESS_KEY
      host_base = s3.amazonaws.com
      host_bucket = %(bucket)s.s3.amazonaws.com
      use_https = True
      EOF
    - s3cmd del --recursive --force s3://terraform-campus-space-dev-bucket/
  rules:
    - if: '$CI_PIPELINE_SOURCE == "schedule"'

destroy:
  stage: destroy
  image:
    name: hashicorp/terraform:light
    entrypoint: [""]
  before_script:
    - apk add --no-cache bash make
  script:
    - make init
    - make destroy
  rules:
    - if: '$CI_PIPELINE_SOURCE == "schedule"'
Delegate the domain to aws
Note
We can either purchase our domain from aws itself or use other dns providers. If you purchased it from aws you can skip this step
We need to give the domain to aws from our dns provider like namecheap,godaddy this is done so that we can give full access of our domain/subdomain to aws . that is done so that we can control the domain/subdomain via terraform. terraform cant access other dns providers so we need it in aws itself so that we can assign it to the cloudfront url.
Create hosted zone
while creating hosted zone specify the subdomain or domain you want to transfer .
Afterwards you will see about 4 ns records associated with the domain you set in the hosted zone
transfer this 4 ns records and paste 1 by 1 as new dns in your dns provider
now after a while our domain will be delegated to aws
now we can easily access our domain through terraform
data "aws_route53_zone" "staging" {
  name         = "staging.campusspace.in"
  private_zone = false
}

# Add a Route 53 alias A record for the CloudFront distribution
resource "aws_route53_record" "alias" {
  zone_id = data.aws_route53_zone.staging.zone_id
  name    = "staging.campusspace.in"
  type    = "A"

  alias {
    name                   = aws_cloudfront_distribution.this.domain_name
    zone_id                = aws_cloudfront_distribution.this.hosted_zone_id
    evaluate_target_health = false
  }
}
Set up scheduled pipelines for deletion of resources.
🛠️ Prerequisites
For a scheduled pipeline to run:
- The schedule owner must have the Developer role.
- For pipelines on protected branches, the schedule owner must be allowed to merge to the branch.
- The
.gitlab-ci.ymlfile must have valid syntax.
⚠️ Note: If these conditions aren't met, the pipeline is not created and no error message is displayed.
📅 Add a Pipeline Schedule
Steps:
- On the left sidebar, select Search or go to and find your project.
- Go to Build > Pipeline schedules.
- Click New schedule and fill in the form:
- Interval Pattern:
Select a preconfigured interval or enter a custom cron expression.
> 🔁 You can use any valid cron value, but scheduled pipelines cannot run more frequently than the instance’s configured limit. - Target branch or tag:
Select the branch or tag the pipeline will run on. - Inputs:
Set values for inputs defined in the pipeline'sspec:inputssection. These values are reused each time the scheduled pipeline runs.
> 💡 A schedule can have up to 20 inputs. - Variables:
Add CI/CD variables specific to the schedule. These variables:- Are available only during scheduled runs.
- Are not used in other pipeline types.
🔒 Tip: Inputs are recommended over variables for better security and flexibility.
⚠️ If the project already has the maximum number of pipeline schedules, you must delete unused ones before adding new schedules.
▶️ Run a Schedule Manually
To trigger a scheduled pipeline immediately:
- On the left sidebar, select Search or go to and find your project.
- Navigate to Build > Pipeline schedules.
- Find the pipeline you want to run and click Run (▶️ icon) on the right.
⏱️ You can manually run scheduled pipelines once per minute.
👤 Note: When run manually, the pipeline uses the permissions of the user who triggered it, not the schedule owner's.